وبلاگ تخصصی مهندسین مرتع و آبخیزداری
فرسایش بادی(شنبه 87 آذر 16 ساعت 3:13 عصر )
ازنظرژئومورفولوگها بادعامل اصلی فرسایش دربیابانهااست.بادعامل برداشت موادورسوب آنهااست.بااین حال نقش آب راهم نمی توان درشکل گیری پدیده ها ی مورفولوژی این نواحی نادیده گرفت.
خاکهای مناطق خشک به دلیل کمبودموادآلی وکلوئیدی وخشکی آسیب پذیرهستند.
فرسایش بادشامل سه مرحله است.این مراحل به ترتیب توضیح داده شده اند.
1- برداشت
عمل برداشت ذرات ریزومنفصل سطح زمین توسط بادرابادبردگی می گویند.
بادذرات ریزخاک رابرداشت می نمایدوذرات درشت رابرجامی گذارد.عمل بادبردگی درمناطقی که مستعدهستندباعث کندن زمین تاعمق زیادی می شود.
براثربادبردگی درمناطق بیابانی عناصر درشتی برجامی ماندکه به عنوان محافظ،سطح خاک راحفظ می نماید.این پوشش را"رگ یا دشت ریگی یا سنگفرش بیابانی "می گویند.
ذراتی که توسط بادحمل می شوندباعث تاثیرفرسایشی روی موانع مختلف یاسطح های ساختمانی موجوددرسرراه خود می شودکه باعث سایش آنها می شود.ازآنجایی که این عمل توسط ذرات ماسه ودرارتفاع پائین انجام می گیردبه آن سایش ماسه ای نیز می گویند.باافزایش ارتفاع این اثرکاسته می شودزیرابارموجوددربادباافزایش ارتفاع کم می شود.این تاثیرموجب پیدایش اشکال ویژه ای مانندقارچ یادودکش ایجادمی نماید.
گاهی فرسایش بادی درمناطق بیابانی موجب تشکیل شیارهاوفرورفتگیهای طویل ونسبتاُعمیقی دررسوبات نرم می شود .امتداداین شیارهامعمولادرجهت بادهای اصلی منطقه است .این دیوارهایاتیغه های بین شیارهارا"یاردانگ" می گویند.این گونه ساختمانهااولین باردرترکستان مشاهده ونامگذاری شده است.
2- حمل
بادموادی راکه فرسایش وروبیده است به صورت باربستری (ذراتی که به علت وزن آنهایادرشتی درسطح یانزدیک زمین حمل می شوند)یابه صورت بارمعلق (ذراتی که به علت ریزی درهوامعلق می مانند)جابجا می کند .درواقع به سه شکل موادراحمل می کند:
- حالت معلق : ذرات بسیارریزخاک باقطرکمتراز1/. میلیمتربه این صورت جابجامی شود.
- حالت خزشی : قدرت بادسبب می شودتاذرات درشت خاک به صورت غلطان درروی سطح زمین به حرکت درآیند.معمولاًذراتی باقطر5/ تا 2 میلیمترحمل می شوند.
- حالت جهشی : ذراتی که بادنمی تواندآنهارابه صورت معلق یاخزشی حمل نمایدبه صورت جهشی حمل نماید.
3- رسوبگذاری
باکم شدن سرعت باد،ازقدرتش برای حمل ذرات کاسته می شود وذرات درنقطه ای ازحرکت بازورسوبگذاری می کند.ذرات درشتربه صورت تلماسه ودانه های ریزتربه صورت لایه های افقی (لس)ته نشین می شوند.
اشکال وناهموریهای ناشی ازتاثیرباد
1-اشکال ناشی ازعمل سایش
ذراتی که توسط باد حمل می شوندپس ازبرخوردبا موانعی که برسرراه آنها وجودداردموجب سایش آنهامی شود .این عمل درنزدیک سطح زمین وتوسطذرات ماسه انجام می گیرد به "سایش ماسه ای"معروف است .قطعه سنگها،ساختمانها،موانع دست سازانسان تحت تاثیر این نوع فرایندقرارمی گیرند.اگرسطح سنگ ازکانیهای باسختی یکسان تشکیل شده باشدسطح آن صاف وصیقلی می شودولی اگردارای کانیهای باسختی متفاوت باشدسطح آن خراشیده یانقطه نقطه می شود.اگرسنگ بهردلیلی ازچندجهت تحت تاثیرسایش قرارگیرددارای چندسطح صاف باگوشه های نوک تیزمی شودکه به آن" بادساب"می گویند.
اگرموانع سنگی منفرددرمسیرباددارای جنس متفاوت باسختی متفاوت باشندباعث بوجودآمدن اشکالی ستونی مانندقارچهایاسندان کفاشی می شود.
2- دشت ریگی یارگ
درمناطق فاقدپوشش گیاهی بادبردگی باعث برداشت ذرات ریزوقابل حمل می شودو ذرات درشتربرجای می مانند، که به آن دشت ریگی می گویند.
3- حفره وفرورفتگی
دربعضی بیابانهابادحفره هاوفرورفتگی های ایجادمی کند.ژئومورفولوژیستهامعتقدنداین پدیده دراثرفرسایش بادی بوجودمی آید.حفره هاغالبا ًکم عمق ودرجهت بادغالب قراردارند.
4- یاردانگ
فرسایش بادی دربعضی مناطق صحرایی موجب تشکیل شیارهاوفرورفتگیهای طویل ونسبتا ًعمیقی دررسوبات نرم می شودکه این شیارهارا"بادکند"وبه دیوارهای میان آنها "یاردانگ" می گویند.امتدادشیارهامعمولاًدرجهت بادهای اصلی منطقه است.ارتفاع یاردانگهابه دههامتروطول آنهابه کیلومترهابرسد.محققین معتقدندایجادیاردانگهانتیجه دخالت فرسایش آبی - بادی است.درلوت گستره بسیاری ازیاردانگ (کلوتها)دیده می شود.
5-اشکال تراکمی باد
بادذراتی راکه باخودحمل می کند ،سرانجام به علت ازدست دادن قدرت حمل خودیابرخوردبا موانع موجوددرسرراه خود،برجای می گذارد.نتیجه این عمل بوجودآمدن اشکال متفاوتی است .تپه های ماسه ای ازبارزترین اشکال تراکمی بادهاهستند.درذیل پاره ای ازآنهاذکرشده است. به منطقه وسیعی که ازتپه های ماسه ای گوناگون تشکیل پوشیده شده باشد ارگ گویند.
الف )تپه های ماسه ای
ذراتی که توسط بادحمل می شوندوقتی باموانع موجوددرسرراه خودبرخوردمی کنند.دانه های ماسه همراه بادوقتی به مانع برخوردکرددرپای آن یادرقسمت بادپناه برجای می مانندوتوده برجسته ای به وجودمی آوردکه خودموجب جمع شدن ذرات بیشتروتشکیل تلماسه می شود.تلماسه هاپس ازتشکیل به حرکت خود ادامه می دهندودرجهت حرکت بادجابجامی شوند.بین ترتیب که بادذرات ماسه را ازسمت مقابل خودبه طرف بالاوجلومی راندوپس ازرسیدن به قله(نقطه قرار) درسمت دیگربه پایین می افتد.تکراراین عمل به تدریج موجب جابجایی ثپه می شود.این جابجایی گاهی به 10تا20متردرسال می رسد.درسطح تلماسه هابرجستگی های دیده می شودکه به " اثرموجی"می گویند.ارتفاع تلماسه هاگاهی تا200مترهم وعرض یک کیلومترمی رسد.
انواع تلماسه:
- بارخان یابرخان.تلماسه ای است هلالی شکل که یه صورت متقارن یاغیرمتقارن دیده می شود.دارای دوبازو است .درجهت مقابل باددارای شیب ملایم امادرجهت مخالف باددارای شیب تنداست .طرف محدب سمت بادقراردارد.
اگریک یاچندبارخان درکناریکدیگرتشکیل شود،بارخانهای عرضی تشکیل می شود.دراین نوع تپه هاجهت بادغالب منطقه عمودبرمحورتپه ها است.اگریکی ازبازوهابه علت تغییربادغالب یابادهای فرعی توسعه یابدورشد نمایدیک تپه طولی تشکیل می شودکه محورتپه موازی بادغالب منطقه است.
- سیف .تپه ماسه ای کشیده است.نوک آن تیزوانتهای آن مدوراست.دامنه مخالف باددارای شیب تندتری نسبت به دامنه روبه باددارد.قسمت پیشانی آن مثلثی بایالهای تیزوگاهی قوسی شکل است.
- سیلک .سیلکهاازاتصال سیفهاوبه صورت خطوط موج داری بوجودمی آیدوتشکیل آن بستگی به بادغالب منطقه دارد.شکل کلی آنهادندانه دارومارپیچی است.
- قوردیاهرمهای ماسه ای. قوردهانتیجه ای بارخان هاوسیف ها است.بارخانهاوسیف هادرجهات مختلف به تدریج به یک نقطه متوجه می شوندودرنتیجه،عوامل وموانع گوناگون ازپیشرفت آنهاجلوگیری می نماید،دراین حالت تپه های ماسه ای دراثربادهای مسلط ،تشکیل توده ای عظیمی را می دهدکه همان قورد است .ارتفاع تپه هابلندترازسایرتپه هااست .
ب) لس
لس رسوبی بادی است که ازذرات یکنواخت،ناپیوسته ومعمولاًزاویه داریانیمه زاویه دارتشکیل شده است.اندازه ذرات آن درحدسیلت ،همراه باکمی رس وگاهی ماسه است.رنگ لس،به علت هوازدگی شیمایی کانیهای آهن داروایجاداکسیدهای آهن ،معمولاًزردیاقهوه ای است .لس هاازته نشین شدن ذراتی که به صورت معلق وبه وسیله بادحمل می شوند،به وجودمی آیندوممکن است دارای منشاء صحرایی یایخچالی باشد.نمونه های آن درغرب کپه داغ و گرگان وجوددارد.
ج) نبکایاتل نباتی
درجاهایی که سطح آبهای زیرزمینی بالااست وموجب رویش گیاهان شده است،انباشت ماسه درپناه گیاهان انجام می گیردکه به صورت نبکایاتل نباتی ظاهرمی شود.این پدیده درپناه گیاهان نمک دوست وخشکی دوستی که توان به دام انداختن ماسه را داشته باشدشکل می گیردوبه نام همان گیاه نامیده می شود.علاوه برماسه های روان موادریزمانندسیلت وذرات ونمک وگچ می توانندبه صورت نبکاظاهرشوند.بزرگترین نبکادرایران درمغرب دشت لوت ومتراکم ترین آنهادردشت جازموریان دیده می شود.
6-ورنی صحرا
ورنی پوسته ای ازترکیبات آهنی است که دراثرنیروی "کاپیلاریته" درروی سنگها ظاهرمی شود.بواسطه ترکیبات آهن،رنگ آنهاتیره است ودراثرعمل سایش بادصیقلی شده ونهایتادرمقابل بادوذرات شن وماسه ی همراه آن مقاوم می شود.دراثرسایش باددرمناطق خشک قلوه سنگها راصیقل داده وسطوحی درآنهاایجاد می کند که به این قلوه سنگها" ویندکانتر"می گویند.
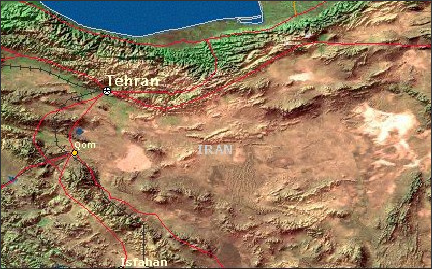
- آشنایی با ریگ جن درکویرمرکزی ایران
ریگ جن منطقه ای وسیعی پوشیده ازتپه های شنی وکویری مخوف درمرکزدشت کویراست.این منطقه درشمالشرقی به منطقه معلمان وکوه گوگردوقسمت جنوب انارک،ازسمت شرق به ناحیه جندق ،ازسمت غرب به پارک ملی کویرمنتهی می شود.جهت تپه های ماسه ای روان ازغرب وشمالغرب به شرق وجنوبشرق کشیده شده است .
مردم شهرهاوروستاهای اطراف این منطقه معتقدندکه محل زندگی ارواح واجنه است.براساس همین اعتقادکمترکسی جرات مسافرت به آن رامی نماید.
سون هدین نویسنده کتاب کویرهای ایران درسال1900 آنرا کشف نمود.آلفونزگابریل نیزدرسال 1930ازقسمت تائیل می گذرد.علی پارسا نیزچندمسافرت درسالهای اخیربه آن نموده است که شرح آنهارادرسایت خودداده است.
یک گروه اتومبیلران به سرپرستی شخصی به نام آقای عباس نژاددرسال 1382نیزازاین منطقه عبورنموده است
")
کویر از فضا
نمایی از ریگ جن
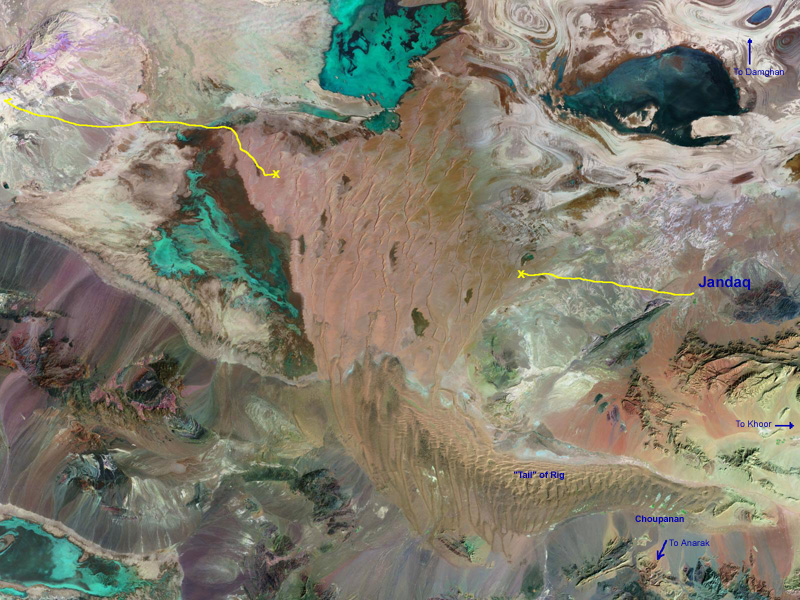
نمایی از ریگ جن
لینک مرتبط http://geoinfo.amu.edu.pl/wpk/geos/GEO_8/GEO_CHAPTER_8_TABLE.HTML
»» نظرات دیگران ( نظر)
کلوت(سه شنبه 87 آذر 12 ساعت 6:23 عصر )
صدا دوره ، اما ؛ هر لحظه قویتر میشه.. صدا تو رو با خودش به شهداد میرسونه ! که قدیمی ترین شهر حاشیه کویر که مسکونی بوده !
با خودت میگی : اما این صدا از کجاست؟ دیگه چیزی برای پیمودن و رسیدن نیست!
اما روبروت تا دلت بخواد و جون توی پات باشه ؛ جا برای رفتن هست تا جایی که دیگه چیزی برای از دست دادن نداشته باشی!
تا پایتخت کشور لوت! تا شهر کلوت ! تا جایی که هر چه صدای بی صداست از آنجاست !

"کلوت" را پایتخت "کویر لوت" می دانند. شاهکاری است از باد، خاک و آب !

آنجا هیچ گیاهی نمی روید
و اساسا هیچ موجود زنده ای وجود ندارد !!!
در شهر "کلوت ها" حتی باکتری ها حق حیات ندارند !!!
شهری که پر است از ساختمان های کوتاه و بلند. کلوت ها در اثر فرسایش آبی و بادی طی هزاران سال شکل گرفته اند.

شاید خیابان ها و کوچه ها را خلوت کردند ، تا تو دمی را به دور از هیاهوی این شهر بزرگ ، به آرامش بنشینی !؟!
هرچه هست ؛ حس شهری مرده را به تو نمی دهد. سراسرش سکوت است و آرامش (جانم چه پر نوای تنهائی !) ،
رازی ناشناخته که تو را به سوی خویش می کشاند.
راز می شوی.. رمز می شوی.. یگانه می شوی.. آخرش هم بدون جواب می مانی ...

میان گویی شیشهای از ستاره قرار میگیری !!!

»» نظرات دیگران ( نظر)
گسلهای زاگرس:(جمعه 87 آذر 8 ساعت 5:40 عصر )
این بخش از گسل زاگرس به نامهای خط عمان، گسل زندان و یا گسلة میناب نیز نامیده شده است.سازوکار گسل زاگرس راندگی – فشاری است. شیب گسل در بخش با راستایN130E، به سمت شمال خاوری (رانده شدن ایران مرکزی بر روی زاگرس) و در بخشN170E به سمت خاور شمال خاوری (رانده شدن مکران بر روی زاگرس) است.مطالعات برو و ریکو (1971)، نشان میدهد که راندگی اصلی زاگرس یک شکستگی تنها نیست، بلکه در حقیقت دو گسل راندگی اصلی است که گاه با هم موازی بوده و گاه بر هم منطبق شده. ولی، گاهی نیز به طور قابل ملاحظه از یکدیگر دور میشوند. از نظر زمان پیدایش، دو گسل تا حدی با یکدیگر تفاوت دارند. گسل قدیمیتر که در جنوب باختری قرار دارد، یک گسل معکوس کم شیب و مشخصکنندة حد جنوب باختری ایران مرکزی و زاگرس است. این گسل جابهجایی افقی حدود 40 کیلومتر دارد. گسل جوانتر به سمت شمال خاور شیب زیاد دارد و یک گسل معکوس با زاویة نزدیک به قائم و با مؤلفه راستگرد است. مشاهدات زمینشناسی حرکت راستگرد این گسل را تأیید میکند و به احتمال همین حرکات موجب جابهجایی سنگهای تبخیری در زاگرس بوده است. به گونهای که سنگهای مذکور که به طور عملی باید در حوضة تبخیری پرکامبرین در امتداد قطر – کازرون تشکل یافته باشند، امروزه در زردکوه بختیاری یعنی 200 تا 300 کیلومتر دورتر قرار دارند. گسل (هـای) جـوان منطبق بر گسل اصلی زاگرس را چالنکو و بـرو (1974) به نام گسل اصلی عهد حاضرMain Recent fault خواندهاند که منطبق بر گسل قدیمی است. این گسل، یک ساختار تنها نیست بلکه زون باریکی از قطعات گسل منفــرد و مجزا و به طور عمومی راستگرد است و طرح همپوشانen echelon دارد. از جنوب خاوری به شمال باختری، قطعات گسل اصلی عهد حاضر عبارتند از گسل دورود، گسل نهاوند، گسل گارون (قارون)، گسل صحنه، گسل مروارید و گسل پیرانشهر (شکل 9-3).
گسل اصلی عهد حاضر، دارای فعالیت لرزهخیزی بالایی است و بسیاری از زلزلههای عهد حاضر در امتداد آن صورت گرفته است و حرکات کواترنری این گسل از نوع امتداد لغز راستگرد است که با تغییر شکل رسوبات کواترنر همراه است. شرح مختصر بخشهای گوناگون گسل اصلی عهد حاضر به شرح زیر است.(بربریان، b 1976).
- گسل دورود : دارای روند عمومی شمال ْ315 و به طول تقریبی 100 کیلومتر است که از جنوب دورود تا حوالی بروجرد امتداد دارد. آخرین حرکت نسبت داده شده به این گسل مربوط به زلزلة مخرب سیلاخور در سال 1909 است.
- گسل نهاوند : در دنبالة گسل دورود است که از 55 کیلومتری باختر بروجرد تا شمال باختری نهاوند، در یک راستای شمال 320 درجه، امتداد دارد. این گسل از چند قطعة مجزا تشکیل شده که خود نامهای جداگانه دارند.
- گسل گارون : به موازات گسل نهاوند و در فاصلة تقریبی 10 کیلومتری جنوب باختری آن قرار دارد. این گسل که در حاشیة جنوب باختری دشت نهاوند قرار دارد رسوبات آبرفتی کواترنر را از سنگهای دگرگونة گارون جدا میکند. حرکات جوان این گسل، همانند گسل نهاوند، با تغییر شکل رسوبات کواترنر و به ویژه زمینلرزة 1958 نهاوند به اثبات رسیده است.
- گسل صحنه: گسل صحنه با طول نزدیک به 100 کیلومتر، در یک روندN295 E تاN300 E دو گسل گارون و گسل مروارید را به یکدیگر وصل میکند. چالنکو این گسل را به سه قطعة جنوب خاوری، مرکزی و شمال باختری تقسیم نموده است.
- گسل مروارید : بخشی از گسل اصلی عهد حاضر است که در منطقة کامیاران قابل رؤیت است. امتداد آنN315-310 است. در نزدیکی کامیاران، این گسل یک تودة بازیک بزرگ را محدود کرده است که در امتداد گسل آلتراسیون هیدروترمال توسعة گسترده دارد. خش لغزهای سطح گسل گویای حرکات بسیار جوان آن است.
- گسل پیرانشهر : نخستین بار افتخارنژاد (1973) این گسل را به نام گسل پیرانشهر نامید. دارای روند شمال باختری – جنوب خاوری است که مرمرهای ژوراسیک – کرتاسه را در جنوب باختری از آبرفتهای کواترنر در شمال خاوری جدا میکند. چالنکو و برو (1974) این گسل را قطعة شمال باختری گسل اصلی عهد حاضر دانستهاند. زمینلرزههای متعددی از سال 1964 تاکنون بر روی این گسل ثبت شده است.
گسل کازرون : گسل شمالی - جنوبی کازرون در 15 کیلومتری باختر این شهرستان قرار دارد. طول آن 450 کیلومتر برآورد شده و گسلی است پیسنگی و قدیمی که ضمن کنترل مرز باختری حوضة نمکی هرمز، بر رسوبات زاگرس نیز اثرگذار بوده به گونهای که ساختارهای زاگرس را با جهت راستگرد خمیده و جابهجا کرده است. در استان فارس، این خمش بسیار چشمگیر است.شواهد نشان میدهد که گسل کازرون با روند به تقریب شمالی – جنوبی و یا شمال شمال باختری – جنوب جنوب خاوری دارای حرکت راستگرد جزیی است. برای نمونه روندهای زمینساختی، در شمال خلیج فارس نشان میدهد که خط مرزی سکوی عربستان و واحد زاگرس به وسیلة این گسل در جهت راستگرد جابهجا شده است. به ظاهر این گسل مرز باختری گسترش حوضة تبخیری پرکامبرین پسین – کامبرین ایران را تشکیل میدهد و در طول آن دو گنبد نمکی رخنمون دارد. (اسفندیاری و برزگر، 1358). نبود دادههای ریزلرزهای و کمبود کانون زلزله نشانگر عدم فعالیت جدید این گسل است، اما زمینزلزلههای ژانویه 1967 و اکتبر 1971 در بخش جنوبی گسل کازرون، نشانگر فعالیت بخشی از گسل کازرون در دورة کواترنری است (بربریان، b 1976) .
گسل دنا (دینار) : گسل دنا با راستای شمال شمال باختری و شیب به سمت خاور شمال خاوری یکی از گسلهای اصلی زاگرس است که بیش از یکصد کیلومتر طول دارد و طرفین خود را به دو بخش با ویژگیهای زمینساختی، لرزهزمینساختی و ریختشناسی متفاوت تقسیم کرده است.در نقشة ژئوفیزیک هوایی، ژرفای پیسنگ مغناطیسی در بخش باختری گسل دنا حدود ده هزار متر و در بخش خاوری آن، بین 1 تا 5 هزار متر زیر سطح دریاست. بدینسان نتیجه شده است که بخش خاوری این گسل، به همراه پیسنگ، به صورت فرابوم بالا آمده است.
گسل دنا، یکی از شکستگیهای اصلی در پی سنگ پرکامبرین زاگرس است که با فعالیتهای بعدی خود، در مواردی بر رسوبات زاگرس تأثیر گذاشته است. بدینسان که رسوبات زاگرس را در مناطقی قطع و در مناطقی باعث پیچش و تغییر راستای این رسوبات و ساختارهای آنها شده است.اطلاعات ژئوفیزیک هوایی مغناطیسی بخش جنوبی گسل دنا را به صورت دو شاخه نشان میدهد. یکی از شاخهها به طرف جنوب میرود و در امتداد خط کازرون قرار میگیرد، شاخه دیگر به سوی جنوب شرق و شیراز میرود. زون گسلی دنا در انتهای شمالی خود یعنی جایی که به گسل بزرگ زاگرس نزدیک میشود نیز شاخه شاخه میشود و به سمت شمال باختر متمایل میشود. در ضمن اطلاعات ژئوفیزیکی گسل مهم دیگری را در امتداد شمالی گسل دنا نشان میدهد که تا دریای خزر ادامه دارد.با بررسی نقشههای زمینشناسی، عکس هوایی و تصویرهای ماهوارهای چنین به نظر میرسد که گسلة دنا افزون بر جنبش فشاری، دارای جنبش راستالغز از گونة راستبر مهمی نیز است. این جنبش، سبب پیچش و کشش پوزة رشتة شمالی کوه دنا شده و احتمال میرود کوه هزاردره و چرو ادامة جابهجا شدگی کوه دنا به صورت راستبر باشد.از ویژگیهای مهم زمینشناسی گسل دنا، بیرونزدگی شماری گنبد نمکی در درازای آن است. در مسیر این گسل، در بخش باختری کوه دنا، سازندهای زاگون و لالون (کامبرین) بر روی سنگهای کرتاسه رانده شدهاند (ستودهنیا، 1975). در گسترة شمال کوه دنا، در دامنة باختری کوه درهبادامی و کوه کمانه سنگهای کرتاسه بر روی دشت و یا سازند بختیاری (پلیوسن) رانده شدهاند (بربریان و قرشی، 1365).
گسل میناب : در ناحیة میناب دو واحد زمینساختی – رسوبی زاگرس و مکران در مجاورت یکدیگر قرار میگیرند. مرز جدایی این دو واحد، منطبق بر گسلی است که به نام رسوبات فلیشی اولیگوسن – میوسن پاکستان، «گسل زنــدان» نامیده شده است. ولی، امروزه از آن به عنــوان گسل میناب یاد میشود (شکل 9-4).
گسل میناب، که بخشی از خط اورال – عمان – ماداگاسکار (فورون، 1941) میباشد، یک گسل امتداد لغز راستگرد است که مرز بین صفحة قارهای زاگرس و پوستة اقیانوسی عمان را تشکیل میدهد که اثر آن را در طول 300 کیلومتر میتوان دنبال کرد.
با توجه به دادههای زمینشناسی، تفسیر عکسهای هوایی، دادههای لرزهشناسی، باور بر آن است که زون گسلی میناب، امتداد لغز است و بلوک خاوری آن به سوی جنوب حرکت کرده است.به عقیدة فالکن (1967)، حرکت افقی راستگرد به احتمال در کرتاسة پسین – ترشیری پیشین صورت گرفته است. اما، وجود گنبدهای نمکی در زاگرس و خلیج فارس و نبود آنها در ناحیة مکران، سبب شده تا بعضی از زمینشناسان، سن این گسل را 500 میلیون سال بدانند.
لازم به یادآوری است که در حال حاضر، حرکت در طول این گسل از نوع رورانده است و از اوایل کواترنری حرکت امتداد لغز نداشته است. (قرشی، 1363).
گسل اردَل : گسل اردَل با درازای حدود 150 کیلومتر، شیب به سمت شمال خاوری و راستای باختری – جنوب خاوری، به موازات راندگی زاگرس در گسترة اردَل – ناغان قرار دارد. سازوکار این گسل فشاری بوده در مسیر آن سازندهای پالئوزوییک همراه با گروه کرتاسة بنگستان (از شمال خاوری) بر روی دشت و سنگهای کرتاسه (در جنوب باختری) رانده شدهاند.
در شمال باختری اردَل در درازای گسل اردَل، چند گنبد نمکی بیرونزدگی دارد.کانون مهلرزهای زمینلرزههای سال 1666، 1880، 1922، 1985 و 1977 میلادی در راستای گسل اردَل قرار دارند ولی همبستگی این زمینلرزهها با جنبش گسل اردَل روشن نیست. بررسی گسل اردَل در زمان رویداد زمینلرزههای سال 1977 میلادی ناغان هیچگونه جنبشی را در راستای آن نشان نداده است (بربریان و نبوی، 1977).
گسل زردکوه : گسل زردکوه با سازوکار فشاری، راستای شمال باختری – جنوب خاوری و شیب به سمت شمال خاوری، به موازات جنوبی گسل اردل قرار دارد. رودخانة بازفت در مسیر گسل زردکوه و به موازات جنوب باختری آن جریان دارد.در مسیر گسل زردکوه سنگهای کامبرین و اردویسین از سمت شمال خاوری بر روی سازند بختیاری (در جنوب باختری) رانده شدهاند (ستودهنیا، 1975). گسل زردکوه با درازای دستکم 130 کیلومتر، بخشی از مرز میان بلند زاگرس و زاگرس چینخورده را تشکیل میدهد.
گسل آغاجاری : این گسل نوعی راندگی به درازای نزدیک به 150 کیلومتر است که روند شمال باختری – جنوب خاوری دارد و در اثر عملکرد آن، تاقدیس آغاجاری و تاقدیس پازنان بر روی دشت آبرفتی آغاجاری رانده شدهاند.
گسل مارون : گسل مارون در شمال باختر گسل آغاجاری و در کمربند زاگرس چینخورده قرار دارد. طول آن نزدیک به 50 کیلومتر است و روندNW-SE دارد. سازوکار گسل مارون از نوع راندگی است که در اثر عملکرد آن تاقدیس مارون به روی دشت مجاور رانده شده است.

»» نظرات دیگران ( نظر)
گسل ویژگیهای مربوط به آن(جمعه 87 آذر 8 ساعت 5:8 عصر )
مقدمه:
پروسه تغیر شکل، ریختها و ترکیبهای مختلفی از سنگها را در مقیاسهای متفاوت ایجاد میکند. در یک سمت کوههای عظیم کره زمین قرار دارند و در سوی دیگر تنشهای موضعی باعث ایجاد ترکهای بسیار ریز در سنگ کف میگردد. از تمام این پدیده ها تحت عنوان "ساختارهای سنگی" یاد میشود. زمانی که یک مطالعه در منطقه انجام میپذیرد، زمین شناس ساختار غالب را تشخیص و توصیف مینماید. یک ساختار معمولا آنقدر عظیم است که فقط قسمت بسیار کوچکی از آن توسط یک بیننده، قابل مشاهده است. اغلب موارد، بیشتر سنگ کف توسط نباتات و یا رسوبات اخیر پنهان شده است. در نتیجه تهیه ساختار زمین شناسی باید بر اساس رخ نمودهای بسیار محدود که شامل مکانهایی است که کف سنگی در سطح زمین نمایان میباشد، انجام پذیرد. برخلاف تمام این مشکلات، برخی تکنیکهای ترسیم زمین شناسان را قادر به شناخت ساختارهای کنونی میسازد. در سالهای اخیر، این مسیر با کمک عکس برداری هوایی، تصویربرداری ماهوارهای و توسعه سیستم مکانیابی جهانی (GPS) هموارتر گردیده است. علاوه بر این تهیه پروفیل زمین با روش انعکاس لرزهای و نیز حفر گمانه ها، در مورد ترکیب و ساختار سنگهای در عمق دادههای زیادی را فراهم مینماید.
در مکانهایی که سنگهای رسوبی موجود میباشند، تهیه ساختار سنگها سادهتر میگردد چرا که لایههای رسوبی معمولا بصورت افقی تشکیل میشوند. در صورتی که لایهها بصورت افقی باقی مانده باشد، نشان میدهد منطقه احتمالا تحت تنش و تغییر شکل نیست. ولی اگر لایه ها خمیده، مایل، یا شکسته شده باشند، نشان دهنده تغییر شکل پس از رسوبگذاری است.
گسلها
گسلها شکستگیهایی در پوسته زمین هستند که در طول آنها تغییر شکلهای قابل توجهی ایجاد شده است. گاهی اوقات گسلهای کوچک در ترانشه های جاده، جائی که لایه های رسوبی چند متر جابجا شده اند، قابل تشخیص هستند. گسلهایی در این مقیاس و اندازه معمولا بصورت تک گسیختگی جدا اتفاق میافتد. در مقابل گسلهای بزرگ، شامل چندین صفحه گسل درگیر میباشند. این منطقه های گسله، میتوانند چندین کیلومتر پهنا داشته باشند و معمولا از روی عکسهای هوایی راحتتر قابل تشخیص هستند تا سطح زمین.
در واقع حضور گسل در یک منطقه نشان میدهد که در یک زمان گذشته، در طول آن جابجایی رخ داده است. این جابجاییها میتوانسته یا بصورت جابجائی آرام باشد که هیچ گونه لرزشی در زمین ایجاد نمیکند و یا اینکه بصورت ناگهانی اتفاق بیفتد که جابجایی های ناگهانی در طول گسلها عامل ایجاد اغلب زلزله ها میباشد. بیشتر گسلها غیر فعال هستند، و باقیماندهای از تغییر شکلهای گذشته میباشند. در امتداد گسلهای فعال، حین جابجائی فرسایشی دو قطعه پوستهای در کنار هم، سنگها شکسته و فشرده میشوند. در سطح صفحات گسلی، سنگها بشدت صیقلی و شیاردار میشوند. این سطوح صیقلی و شیاردار به زمین شناسان در شناخت جهت آخرین جابجایی ایجادشده در طول گسل کمک میکند. که زمین شناسان بر اساس جهت حرکت گسلها، آنها را به انواع مختلفی تقسیم بندی میکنند که در قسمت انواع گسلها به این تقسیم بندی میپردازیم.
مشخصات گسلها
برای تعریف گسلها، از مشخصات هندسی آنها، یعنی موقعیت قرارگیری آنها در یک فضای سه بعدی، استفاده میشود که عمدهترین این مشخصات هندسی راستا و شیب میباشند. شناخت این پارامترها در سطح، زمین شناسان را قادر میسازد تا ساختار سنگها و گسلها را در زیر زمین و قسمتهای دور از دیدشان، پیشبینی نمایند.
راستا[1]: جهت و راستای خط تلاقی صفحه گسل با افق تحت عنوان راستا شناخته میشود. راستا معمولا بصورت زاویهای با شمال مشخص میگردد. برای مثال عبارت N20E نشان میدهد که راستای گسل 20 درجه به سمت شرق نسبت به جهت شمال متمایل است.
شیب[2]: عبارتست از شیب سطح یک توده سنگی یا صفحه گسل، نسبت به صفحه افق. شیب شامل زاویه انحراف و نیز جهت آن میباشد. جهت متصور شدن شیب یک گسل، بخاطر سپاری این نکته است که آب همیشه در صفحه موازی با شیب گسل به سمت پایین جاری خواهد شد.
.jpg)
شکل: نمایش خط راستا و شیب و نیز جهت شیب
.jpg)
شکل: نمایش خط راستا و شیب و نیز جهت شیب
برای نمایش گسلها بر روی نقشههای زمین شناسی، بدین ترتیب عمل میشود که با یک خط راستای گسل را نشان میدهند و با یک خط کوتاهتر و عمود بر خط قبلی، جهت شیب را مشخص کرده و درجه شیب را در کنار آن مینویسند.
.gif)
انواع گسلها
تقسیم بندی گسلها فقط بر اساس هندسه و جهت جابجائی نسبی ایجاد شده در آنها صورت میپذیرد. گسلهای راستا لغز و گسلهای شیب لغز دو تقسیم بندی کلی گسلها میباشند که در زیر تعاریف مربوط به آنها آورده میشود.
گسلهای امتداد لغز
گسلهایی که امتداد اصلی لغزش در امتداد راستای گسل باشد، گسل امتداد لغز نامیده میشوند. بر اساس جهت حرکت در امتداد راستای گسل، گسلهای چپ گرد و یا راست گرد را میتوان تشخیص داد. نحوه تشخیص بدین ترتیب است که اگر در یک سمت از گسل بایستیم و حرکت سمت دیگر را نظاره نماییم، اگر حرکت آن از سمت چپ به راست باشد، گسل راست گرد و در حالت برعکس چپ گرد خواهد بود. بعنوان مثال شکل زیر یک گسل امتداد لغز راست گرد را نشان میدهد.
.jpg)
گسلهای شیب لغز:
گسلهایی که امتداد اصلی لغزش موازی جهت شیب گسل باشد، گسلهای شیب لغز نامیده میشوند. گسلهای شیب لغز نرمال[3] و معکوس[4] بر اساس جهت حرکت دو قطعه نسبت به هم تعریف میشوند. در صورتی که نیروی وارده فشاری بوده و دو قطعه را به هم نزدیک کند، گسل شیب لغز معکوس و در صورت دو شدن دو قطعه از هم گسل شیب لغز نرمال نامیده میشود.
بر اساس حرکتهای قائم دو قطعه نسبت به هم، فرا دیواره و فرو دیواره قابل تشخیص است. در زبان انگلیسی به فرا دیواره Hanging wall ( دیواره آوریز ) و به فرو دیواره Footwall اطلاق میشود. دلیل این نامگذاری برمیگردد به معدنکارانی که در معادن زیر زمینی کار میکردند. چون غالبا معادن در محل تقاطع دو قطعه قرار دارند، فرا دیواره سقف معادن را تشکیل میدهد که محل آویزان کردن چراغها در داخل معادن بود (Hanging wall) و فرو دیواره کف معدن یا محلی که پا بر روی آن قرار میگیرد است که به آن Footwall اطلاق می شود. در زبان فارسی از دو اصطلاح فرا دیواره و فرو دیواره برای نامگذاری استفاده میشود.
.jpg)
شکل: فرا دیواره و فرو دیواره در گسل معکوس
در عمل لغزش گسل، ترکیبی از شیب لغز و راستا لغز میباشد که گسل مایل نامیده میشود. در شکل زیر تمام حالتهای ممکن به نمایش گذاشته شده است.
.jpg)
»» نظرات دیگران ( نظر)
ظرفیت مزرعه(سه شنبه 87 آذر 5 ساعت 4:36 عصر )
حد بالای ظرفیت انرژی باد(انگلیسی )
تاثیر گرما در ظرفیت مزرعه در استرالیاانگلیسی )
سرمایه گزاری حداکثر در ظرفیت استفاده از زمین و آب سطحی مزرعه در ایران(انگلیسی )
»» نظرات دیگران ( نظر)
گندمیان مرتعی(چهارشنبه 87 آبان 22 ساعت 3:19 عصر )
1.رشد نهال چند ساله ،سالانه در ناحیه بین کوهستانی در بین گندمیان مرتعی English(pdf)
2.الگو فصلی جوانه زدن و طول عمر بذر در گیاه مرتعی گل پرEnglish(pdf)
3.نفوذ و ذخیره سازی و درجه حرارت و نور روی جوانه زدن بذر Japanese brome (English-pdf)
4.تاثیر چرا گوسفند روی پربرگ شدن فرفیون (English-pdf)
5.عرض جغرافیایی و بقا در زمستان و افزایش علوفه و مخصول گونه ای از گراس english-pdf
»» نظرات دیگران ( نظر)
(2) (قسمت دوم)Palm Seed Germination(سه شنبه 87 آبان 21 ساعت 2:52 عصر )
(2) Palm Seed Germination
Sowing Palm Seed
Containers
A variety of germination containers can be used for palms seeds, including pots and flats. Pots are better than flats du to the deeper soil column and better drainage. For very deep-rooted species, and especially those that bury the seedling axis, tree tubes, lengths of PVC pipe, or other improvised containers have been used to provide the extra depth that these seedlings require during early development. Some growers prefer to sow seed in large raised beds constructed from wood or cinder blocks. The most important consideration for any germination container is that it allows adequate drainage of excess water from the medium.Medium
Palm seed germination media must be well-drained, yet have some moisture-holding capacity. A pattern of alternat extremes of dryness and wetness is detrimental to palm seeds during germination. Particle size in the medium should not be excessively large nor prone to separation with repeated irrigation. A 1:1 mixture by volume of peat moss and perlite has been successfully used under a wide range of nursery conditions. The mix in a germination medium should be adjusted depending on the conditions to which the seed will be exposed. For example, seed germinated in full sun will require a medium with higher water holding capacity than seed germinated under shade, all other conditions being equal.Planting Depth and Spacing
The depth at which palm seed will be sown varies with size of the seed and the species being grown. More importantly, environmental conditions dictate depth of planting. If seed will be germinated in full sun, it is usually necessary to cover the seed with medium so that it will not dry out. A rule of thumb to follow is to cover the seed to a level equal to the diameter of the seed. For example, seed 1/4 inch in diameter would be planted at a depth of 1/4 inch below the surface. However, if the seed is to be germinated under shade, it is usually better to sow it shallowly. In the case of larger seeds, this means merely pressing them into the soil so that the top of the seed is exposed. Frequency of irrigation will also influence the planting depth. Seed germinated in full sun can be planted more shallowly if irrigation will be frequent enough so that the medium does not dry out. The initial planting density depends on the ultimate use of the germinated seedlings as well as how quickly the nursery operator anticipates transplanting the seedlings. Many growers broadcast small (1/4 inch diameter or less) and medium-sized (1/2 to 1 inch diameter) palm seed very thickly in the germinating container, in some cases completely covering the surface of the medium with seed. This works fine (and saves space and labor) if the transplanted liner will consist of all or a number of the seedlings potted together (for example, areca palms, Figure 9, and some Chamaedorea species) or if the seedlings will be separated and transplanted before a great deal of root development has taken place. Otherwise, it is best to sow the seed with some space between adjacent seeds. Large seeds, especially those of difficult to transplant species such as Bismarckia, are often sown one per container.
Figure 9. Areca palm (Dypsis lutescens) seed sown densely in a 4-inch pot. The germinated seedlings will be transplanted together to make a dense specimen plant.
Germination Conditions
Temperature
Virtually all palms require high temperatures for the most rapid and uniform germination of their seed. Seventy to 100°F is the accepted range, and 85-95°F probably yields the best results. Seed of paurotis palm (Acoelorraphe wrightii) has been reported to germinate best at 92-102°F, with only 11% germination below 86°F (Carpenter, 1988a). The native Keys thatch palm (Thrinax morrisii) and silver palm (Cocothrinax argentata) germinated best at 91-97°F, with few seeds germinating below 77°F (Carpenter, 1988a; Carpenter & Gilman, 1988). Seed of pindo palm (Butia capitata) germinated best with 2-3 weeks at 102°F, followed by 86°F for the duration of the germination period (Carpenter, 1988b). Some research has suggested that fluctuating temperatures at 12 hour intervals may increase total germination for certain species (Carpenter, 1987, 1989), but this is not practical for most growers. Since palm seeds require high germination temperatures, it is best to sow seed during the warmer months of the year. If availability of fresh seed makes this difficult, soil temperatures can be increased by using bottom heat below the germination containers or by covering the containers with clear plastic. Placing the containers on a heat-retaining surface can also increase temperatures by several degrees.Light
Many palms germinate in the understory of a forest canopy in their native habitats, even if they eventually grow up into full sun (royal palm, Roystonea spp., for example). Seedlings of these species can be germinated in full sun but their leaves may bleach to some extent under those conditions. Many growers feel that, despite the bleaching, root growth and overall seedling development are enhanced in full sun. Under shade, seedlings will generally have a deeper green color. Some species grow best in the shade (Licuala spp., for example). Seed of the latter group should be germinated under shade. Seedlings of such species, if exposed to full sun, usually bleach severely, burn and may even die. Species native to open habitats show no ill effects when germinated in full sun. It is generally necessary to adjust seed planting depth according to the light levels to which the seed will be exposed (see previous section).Irrigation
Palm seeds require uniform moisture during the first critical stages of germination when the cotyledonary petiole (in remote germinators) or button (in adjacent germinators) first emerges from the seed. Alternating periods of extreme wet and dry during this time period will usually have deleterious effects on total germination percentages. If the germination medium does not receive some type of automatic irrigation, it may be necessary to cover the containers with clear plastic to retain adequate soil moisture. Overwatering can be equally deleterious. At no time should standing water be visible on the surface of the germinating medium.Fertilization
Palm seedlings do not require supplementary fertilization for the first two months after germination. The endosperm within the seed provides all the nutrition that the seedling needs during this period. Supplemental fertilization during the first two months not only wastes fertilizer but can injure the young seedling.Germination Time
The rate at which palm seed germinates, the uniformity of germination, and the percentage of total germination can vary tremendously from species to species, from seed lots collected from different plants of the same species, and even from seed lots collected in different years from the same plant. Seed of Mexican fan palm (Washingtonia robusta) may begin to germinate in less than 2 weeks, seed of areca palm (Dypsis lutescens) in 3-4 weeks, while seed of parlor palm (Chamaedorea elegans) may not begin to germinate for several months and then continue sporadically for over a year. When planting palm seed of species with which one has no previous experience, or for which no germination information can be found, one should remain patient as long as the seed appears in good condition. A fairly comprehensive list of germination data across a wide variety of palm species can be found in Wagner (1982).Transplanting the Seedlings
Figure 10. Palm seedlings in the germination container ready for transplanting.
Figure 11. Palm seedlings should not be transplanted more deeply than the point indicated by arrow.
Vegetative Propagation of Palms
Despite the overwhelming reliance on seed propagation for palms, there are several methods of clonal (vegetative) propagation that can be used for a few species.Division
Clustering palms, that is those that produce new erect shoots from a common base or system of rhizomes, can be divided carefully as a means of increasing stock. Species that produce new shoots at some distance from the parent stems (Rhapis species, for example), are the most easily divided. Many Chamaedorea species, Areca and other Dypsis species, and Paurotis palm (Acelorraphe wrightii) are amenable to this type of propagation. Stock in containers is generally easiest to divide. For best results in the field or landscape, it is advisable to separate divisions from the parent plant with a sharp spade in the spring, but leave the divisions in place until new growth is evident. At that time the divisions can be carefully lifted, with as much of the root ball as can be managed. Newly separated divisions are best potted and kept shaded and well-watered until established (at least 1 year), after which they can situated in the ground.Airlayering (Marcottage)
A number of Chamaedorea species produce conspicuous short aerial roots at the stem nodes (leaf scars). These species can be airlayered by applying a swath of moist sphagnum peat moss around one to several nodes and wrapping the area in aluminum foil. The aerial roots will grow into the moss. When sufficient root growth has occurred, the stem can be cut from the parent plant and potted. Newly cut layers should be kept shaded and well-irrigated until established in their containers.Offsets
Several date palm species, most notably the commercial date palm, Phoenix dactylifera, produce offsets or suckers at the base of the trunk. These can be cut from the parent plant and either planted in containers or planted directly in the ground. If no roots are present when the suckers are cut, the leaves should be reduced in number and/or size.Summary
1. Collect palm seeds from source trees when the fruit is ripe. 2. Clean palm seed from the fruit immediately upon collection, air-dry it, dust it with fungicide, and either plant it immediately or store it. 3. Store palm seed dry in sealed plastic bags at temperatures above 65°F. Life in storage will vary from several weeks to over a year. 4. A 1 to 7 day presoak in water is recommended for palm seeds before planting. The water should be changed daily. A soak in gibberelic acid (GA3) is not recommended. 5. Germination containers and media should balance moisture retention and good drainage. A 1:1 by volume mixture of peat moss and perlite is widely used. 6. If seed will be germinated in full sun, it is usually necessary to cover the seed with medium so that it will not dry out. However, if the seed is to be germinated under shade, shallow sowing is best. 7. Palm seeds require high temperatures for best germination. Seventy to 100°F is the accepted range, and 85-95°F probably yields the best results. 8. Seed of most palms can be germinated in full sun, though leaves of some species may bleach slightly. Seed of understory palms are best germinated in shade. 9. Palm seedlings do not require supplementary fertilization for at least two months after germination begins. 10. The seed of many palm species requires several months to begin germination, and the total period of germination may last for over a year. 11. Transplant palm seedlings before the root systems in the germination container become greatly entangled. It is generally best to wait until at least one leaf has appeared. Transplanting is best reserved for the warmer months of the year, when root growth will be rapid. 12. Palms are very intolerant of being planted too deeply. Transplant palm seedlings so that the point on the seedling stem where the root system appears to begin lies at the soil surface. 13. Do not sever the connection of the seed to the seedling palm when transplanting. 14. Root pruning seedlings when transplanting is not recommended.Bibliography
Broschat, T. K. and H. Donselman. 1986. Factors affecting storage and germination of Chrysalidocarpus lutescens seeds. J. Amer. Soc. Hort. Sci. 111: 872-877. Broschat, T. K. and H. Donselman. 1987. Effects of fruit maturity, storage, presoaking, and seed cleaning on germination in three species of palms. J. Environ. Hort. 5: 6-9. Broschat, T. K. and H. Donselman. 1988. Palm seed storage and germination studies. Principes 32: 3-12. Carpenter, W. J. 1987. Temperature and imbibition effects on seed germination of Sabal palmetto and Serenoa repens. HortScience 22: 660. Carpenter, W. J. 1988a. Temperature affects seed germination of four Florida palm species. HortScience 23: 336-337. Carpenter, W. J. 1988b. Seed after-ripening and temperature influence Butia capitata germination. HortScience 23: 702-703. Carpenter, W. J. 1989. Influence of temperature on germination of Sabal causiarum seed. Principes 33: 191-194. Carpenter, W. J. and E. F. Gilman. 1988. Effect of temperature and desiccation on the germination of Thrinax morrisii. Proc. Fla. State Hort. Soc. 101: 288-290. De Leon, N. J. 1958. Viability of palm seeds. Principes 2: 96-98. Doughty, S. C., E. N. O"Rourke, E. P. Barrios and R. P. Mowers. 1986. Germination induction of pygmy date palm seed. Principes 30: 85-87. Holmquist, J. de Dios and J. Popenoe. 1967. The effect of scarification on the germination of seed of Acrocomia crispa and Arenga engleri. Principes 11: 23-25. Kitzke, E. D. 1958. A method for germinating Copernicia palm seeds. Principes 2: 5-8. Loomis, H. F. 1958. The preparation and germination of palm seeds. Principes 2: 98-102. Nagao, M. A. and W. S. Sakai. 1979. Effect of growth regulators on seed germination of Archontophoenix alexandrae. HortScience 14: 182-183. Nagao, M. A., K. Kanegawa and W. S. Sakai. 1980. Accelerating palm seed germination with gibberellic acid, scarification, and bottom heat. HortScience 15: 200-201. Meerow, A. W. 1994. Fungicide treatment of pygmy date palm seeds affects seedling emergence. HortScience 29: 1201. Odetola, J. A. 1987. Studies on seed dormancy, viability, and germination in ornamental palms. Principes 31: 24-30. Tomlinson, P. B. 1990. The Structural Biology Of Palms. Clarendon Press, Oxford. Wagner, R. I. 1982. Raising ornamental palms. Principes 26: 86-101»» نظرات دیگران ( نظر)
(قسمت اول)Palm Seed Germination1(سه شنبه 87 آبان 21 ساعت 2:17 عصر )
Palms are unique among woody ornamental plants because, with relatively few exceptions, palm species can only be propagated from seed. Palms are also notorious in the nursery trade for slow and uneven seed germination. It has been estimated that over 25% of all palm species require over 100 days to germinate and have less than 20% total germination (Tomlinson, 1990). The reasons for this remain obscure, as very little investigative work has been accomplished on seed dormancy conditions in palms. Nonetheless, the palm grower can maximize success with germinating palm seeds by paying careful attention to a number of basic guidelines. The purpose of this publication is to outline and discuss the various aspects of handling and germinating palm seeds in the most cost-effective and reliable manner possible.
The Palm Seed
Palm seeds vary tremendously with respect to size. Many palms have seeds no larger than 1/4 inch in diameter, while the largest seed of any flowering plant in the world is that of a palm (the double coconut, Lodoicea maldivica). The bulk of a palm seed is taken up by nutritive tissue called endosperm that provides food for the germinating seedling for a longer period of time than most flowering plants (Figure 1). The "milk" and white meat of a coconut are liquid and solid endosperm, respectively. The palm embryo is very small, either cylindrical or top-shaped. The seeds themselves may be either round or variously elongated. Their surfaces may be smooth or intricately sculptured. Some are surrounded by a hard, water- and air-impermeable coat. Fibers from the fruit wall frequently remain attached to the seed, even after cleaning.
Figure 1. Longitudinal and cross section through a coconut fruit.
Types of Palm Seed Germination
The way palm seeds germinate falls into one of two categories. In palms with remote germination (Figure 2a-c), the seedling axis develops at some distance from the actual seed. The first structure to emerge from the seed is called the "cotyledonary petiole." It resembles, and many people mistake it for, the first seedling root. The cotyledonary petiole grows downward into the soil (sometimes very deeply) and swells at its base. From this swelling emerges the first seedling root (radicle) and seedling shoot (plumule). The actual cotyledon or seed leaf remains inside the seed, functioning as an absorptive organ called the "haustorium." The haustorium transfers nutrients from the endosperm to the young seedling. In palm seeds with remote germination, the radicle persists for some time and produces lateral roots. The seeds of Mediterranean fan palms (Chamaerops humilis), Chinese fan palms (Livistona chinensis), date palms (Phoenix spp.) and Mexican fan palms (Washingtonia robusta) have remote germination. The other main class of palm seed germination is called adjacent germination (Figure 2d-f). In these seeds, only a small portion of the cotyledon emerges from the seed. It appears as a swollen body abutting the seed surface and is called the "button." The radicle and plumule emerge from the bottom and top of the button. In palms with adjacent germination, the first seedling root or radicle is usually narrow and very short lived and is quickly replaced by roots formed at the seedling stem base (adventitious roots). As with remote germination, a haustorium remains inside the seed absorbing food from the endosperm. Some common palms with adjacent germination include areca (Dypsis lutescens), King Alexander palm (Archontophoenix alexandrae) and coconut (Cocos nucifera). In coconut, however, the first stages of germination occur in the fibrous fruit wall that adheres to the seed. They cannot be observed without dehusking the nut. A number of palm species (Bismarckia, for example) bury the seedling axis deep in the soil. These species require some special handling that will be discussed later in this circular.
Figure 2. Main classes of palm seed germination. A-B. Remote germination, date palm (Phoenix dactylifera). A. Early germination with cotyledonary petiole emerged and seedling root (radicle) beginning growth. B. Seedling stem (plumule) emerging from cotyledonary sheath. C. First leaf (eophyll) emerged, radicle continuing to elongate, and haustorium inside seed absorbing nutrients from endosperm. D-F. Adjacent germination, piccabean palm (Archontophoenix cunninghamiana). D. Early germination with button emerged. E. Seedling root (radicle) and stem (plumule) emerging from button. F. First leaves (eophylls) emerging, first adventitious root formed and supplanting radicle, and haustorium inside seed absorbing nutrients from endosperm.
Sources of Seed
Seeds may be collected from local sources (trees in the landscape) or purchased from commercial dealers. Local collection has certain advantages; the freshness, degree of maturity and parentage of the seed is usually known by the collector. If the seed will be stored, the collector will be controlling the methods used and the duration of storage. Commercial dealers can usually offer larger quantities and a greater diversity of species. Commercial dealers will also be handling the time consuming chores of seed cleaning, which may require special equipment. However, the age and ultimate germination percentage of purchased seed is frequently unknown. Testing a sample of commercially available seed before purchase is a wise precaution (see next section).Seed Maturity
With few exceptions seed should be collected when the fruit is completely ripe (showing full color), or as soon as it falls from the tree (Figure 3). A few exceptions have been noted. Seed from green fruits of queen palm (Syagrus romanzoffiana) germinate better than seed from half-ripe or ripe seed (Broschat & Donselman, 1987), perhaps due to inhibitors in the fruit. Seed of royal palm (Roystonea regia) from ripe fruits germinated more slowly than seed from half-ripe or green fruits, but fewer of the unripe seed ultimately germinated (Broschat & Donselman, 1987).
Figure 3. Queen palm (Syagrus romanzoffiana) fruit harvested from the tree and ready for processing.
Viability of Palm Seed
Viability of palm seeds can vary among trees of the same species, and even from year to year from the same tree. Age of the seed and/or the storage methods used (see next section) can directly influence the ultimate germination percentage. Seeds of some palms generally remain viable for only 2-3 weeks (e.g., latan palms, Latania spp.), while others may retain viability for over a year (areca, Dypsis lutescens) if stored properly (Broschat & Donselman, 1986). It is a good idea to test sample seed lots for viability before purchasing large quantities. Some growers advocate using a seed float test. The seeds are placed in water and those that float are discarded as inviable. However, some palm seeds naturally float because they are dispersed in nature by water. Furthermore, some growers have found that if the floating seeds are planted, a sizable number will germinate. There are two recognized ways to quickly test seed viability on a random sample of the entire lot:Observation
Cut open a sample of the seeds. The endosperm should be firm and the tiny embryo should fill its chamber (located at one end of the seed). If the endosperm is soft and spongy; or the embryo shriveled, discolored, or absent; or if the seed coat appears to have detiorated, then the seed is probably inviable (Figure 4).
Figure 4. Cross section through viable (right) and inviable (left) seed of Areca palm (Dypsis lutescens). Note shrunken endosperm and embryo in seed on left.
Tetrazolium Chloride Test
Mix a 1% (10 gm/l) aqueous solution of tetrazolium chloride (available from any chemical supplier). Cut a sample of the seeds in half to expose the embryo and place the half containg the embryo in the solution. Put the container in the dark for at least 2 hours (a full day is sometimes required). If the embryo stains partially or completely red or pink, it is probably viable. If there is no stain, the seed is likely inviable.Cleaning Palm Seed
Figure 5. Cleaned (left) and uncleaned (right) seed of queen palm (Syagrus romanzoffiana).
Figure 6. Palm fruit soaking in water to soften the mesocarp.
Figure 7. Cement-mixing machine used to clean palm seeds. Gravel inside the machine abrades the fruit pulp from the seed.
Storage of Palm Seed
With few exceptions, it is best to plant palm seed shortly after cleaning. If this is not possible, the best general storage procedure is to dust cleaned and air-dried seed with thiram (Thylate®) or captan, seal the seed in plastic bags, and store at 65-75°F. There is some evidence that maintaining this covering of fungicide when the seeds are sown may http://flrec.ifas.ufl.edu/pdfs/tropicLine/TropicLine_07-2.pdf (Meerow, 1994). Seeds of most tropical palms will lose viability if stored at temperatures below 60°F. Broschat and Donselman (1986, 1987, 1988) found that cleaned seed of Areca (Dypsis lutescens) could be stored at 73°F for over 1 year without significant loss of viability, royal palm (Roystonea regia) for 9 months, queen palm (Syagrus romanzoffiana) for 4 months, and pygmy date (Phoenix robelenii) for 8 months. In the case of royal palm, up to 9 months of storage actually increased germination relative to planting fresh seed immediately. Seeds of pindo palm (Butia capitata) actually require a period of dry storage for optimum germination (Carpenter, 1988b). The duration of the period increases with decreased temperature: 90 days at 77°F, 120 days at 59°F, and 150 days at 41°F. Generally, palms from seasonal climates (versus uniformly tropical) may have greater tolerance for low temperature storage. Seeds of the native silver palm (Coccothrinax argentata) and thatch palm (Thrinax morrisii) have withstood -4°F and 15°F respectively for one week without loss of viability (Carpenter, 1988a; Carpenter & Gilman, 1988). Seeds of more tropical species (areca, Dypsis lutescens, for example) may be killed after storage for 24 hours at 40°F (Broschat & Donselman, 1986).Pretreatment Before Planting
Due to the often slow and uneven germination of palm seeds, there has been a great deal of interest in any preplant treatments that might speed germination or result in more even rates of germination. For the commercial palm grower, the value of seed pretreatments must be weighed against the additional labor costs involved.Water Soak
A fairly universal recommendation has been to soak palm seed in water for 1 to 7 days. It is advisable to change the water daily. Such a pretreatment is useful only after dormancy requirements (if any) have been met, though few palm species have been tested for indications of seed dormancy. The seed must be planted immediately after the treatment, as storage following water imbibation may induce a secondary dormancy. One researcher germinated seeds of fifteen species of the genus Copernicia entirely in water (Kitzke, 1958). Not all species respond positively to a water soak treatment (Broschat & Donselman, 1987, 1988; Carpenter, 1987, 1988; Doughty et al. 1986; Odetola, 1987), and experiments documented in the literature have rarely tried varying the duration of the presoak period on seeds of the same species. However, unlike some of the other pretreatments described below, a water soak poses little danger to the seed.Soak in Gibberelic Acid (GA3)
A number of investigators have reported a hastening affect on germination by soaking seed in 10 to 2000 parts-per-million (ppm) concentration of GA3 for 1 to 3 days (Doughty et al., 1986; Nagao & Sakai, 1979; Nagao et al., 1980; Odetola, 1987). One study found 10-25 ppm worked well for a wide variety of species (Odetola, 1987). However, treatment with this growth regulator causes excessive elongation of the seedling (Figure 8), in some cases even preventing the seedling from supporting itself (Broschat & Donselman, 1987, 1988). Consequently, it is not advisable to use a GA3 presoak despite any positive effects on germination rate.
Figure 8. Excessive elongation of Areca palm (Dypsis lutescens) seeds on left was caused by pretreating seed with a presoak of gibberelic acid (GA3).
Scarification
Scarification of palm seed involves thinning the bony endocarp of palm seeds that may impede imbibition of water. It may be accomplished mechanically, by abrading the surface of the seed until the endosperm becomes visible, or by soaking the seed in dilute to concentrated sulfuric acid (H2SO4) for 10 to 30 minutes. Scarification has increased the rate of germination of a number of palm species with hard, water-impermeable seed coats (Holmquist & Popenoe, 1967; Nagao et al., 1980; Odetola, 1987). The danger in mechanical or acid scarification is damage to the embryo during the process. The practice should be reserved for seeds with hard and impermeable seed coats. Species that have slow or uneven germination without scarification should have seed scarified on a trial basis before the entire lot of seed is treated.»» نظرات دیگران ( نظر)
Successful Seed Germination(سه شنبه 87 آبان 21 ساعت 2:5 عصر )
Successful Seed Germination
A seed is a miracle waiting to happen. The embryo comes pre-packaged with a food supply and the vital genetic information needed to become a plant just like its parents. Seeds exist in a state of dormancy, absorbing oxygen, giving off carbon dioxide, and slowly using up their stored food reserves. During this process the seed continually monitors the external environment waiting for ideal conditions specific for the particular seed. Once the ideal conditions occur, the seed breaks dormancy and germinates. The seedling gathers energy through its leaves by the process of photosynthesis and absorbs nutrients and water from the soil through the roots. As gardeners, our goal is to provide the optimal environment for germination and seedling growth.
For germinating seeds indoors, select a well-drained potting medium designed specifically for germinating seeds. Use clean containers with drainage holes in the bottom. Wash used containers with warm soapy water and rinse with a dilute bleach solution (1 part bleach to 9 parts water). Slightly overfill containers with the potting soil and tap the bottom and sides to encourage even settling.
Create a level surface by scraping excess soil with a board or knife. Do not press or compact the soil which will make it harder for the seeds to get started. Some gardeners will lightly firm the soil with a board to create a level surface. Moisten the soil either by watering carefully from the top or letting water soak up through the bottom. Allow excess water to drain away.
Seeds require a certain temperature in order to germinate. Each plant has a specific optimum and a range within which germination will occur. The closer the temperature is to optimum the quicker germination will occur. Most seeds germinate when the soil temperature is between 68(and 86(F. Once germination occurs, the optimum growing temperature for theseedling is about 10(F cooler than the optimum germination temperature.
Moisture is critical for germinating seeds. They like a moist but not soggy environment. Seeds require oxygen and if kept in a waterlogged state may rot. On the other hand, if the soil dries out, the seed will lose whatever water it has absorbed and will die. Finding the middle ground can be difficult and comes easier with practice. After sowing the seeds, mist the tray with water and cover with plastic wrap, a plastic bag, glass or plexiglass to seal in moisture. As soon as seed germinates remove the covering. Check the seedlings twice a day for moisture. Allow the soil surface to dry between waterings. Ventilation and air circulation are also important to discourage damping off diseases. Some seeds need light in order to germinate, but many do not. Seed packages will usually indicate what your particular selection requires. It is important to follow the directions given on the package for planting depth. In addition to light requirements, seeds that are planted too deep will not have enough stored energy to reach the soil surface and may die in the process. After germination occurs, seedlings require about 12 to 16 hours of light a day. Intense light is necessary to prevent spindly or leggy seedlings. If you are growing under lights, make sure the light source is 4 to 6 inches above the plants. In a sunny window, turn the seedlings regularly to avoid leaning.
If you are sowing seeds in furrows or flats, transplant individual seedlings into cell packs when the first true leaves appear or when they are large enough to handle Seedlings started indoors should be fertilized regularly with a dilute (1/4 strength) water soluble fertilizer. This will help to produce stockier transplants provided enough light is available.
Before planting in the garden, gradually acclimate transplants to the outdoors. Start by putting them outside on cloudy days or in a shaded location then after a few days work them into more light and exposure. Overcast skies or late afternoon is the best time to plant in the garden. Water immediately after transplanting. If plants wilt, provide some protection with an open milk carton or a board for a few days.
As gardeners everywhere begin the gardening season, these suggestions should help in raising strong healthy plants for enjoyment in the months to come.
This article originally appeared in the February 9, 1996 issue, p. 11.
»» نظرات دیگران ( نظر)
SEED GERMINATION(جوانه زدن بذر)(سه شنبه 87 آبان 21 ساعت 1:59 عصر )
The most common cause of poor germination associated with wildflowers is the depth at which the seeds are sown. Small seeds should be planted on the soil surface and pressed or rolled in for best results since they contain only enough stored food for a limited period of growth. If the seedling is to survive, it must emerge from the soil and quickly begin to produce its own food. If seeds are too deeply buried beneath the soil surface, the seedling will either exhaust its food reserve prior to reaching the soil surface causing its death, or lack of sufficient oxygen will prohibit germination altogether.
Within the deive literature of each species, we have listed the following germination data to assist you in your planting.
 GERMINATION DAYS:
The average time period in which a particular variety will germinate given optimum conditions. Please allow a variance of plus or minus 25%.
OPTIMUM SOIL TEMPERATURE FOR GERMINATION:
The optimum temperature in degrees Fahrenheit for rapid germination. A steady temperature between the published limits, based on laboratory data, is recommended for best results.
SOWING DEPTH:
An increment in inches has been included for each variety as a quick reference for optimum sowing depth. A good rule to follow, if in doubt about any variety, is to sow the seed at a shallow depth.
SURFACE SOW:
Due to the extremely small size of the seed, the area should be prepared and the seed sown directly on the surface of the soil, then pressed or rolled in. DO NOT COVER
»» نظرات دیگران ( نظر)
لیست کل یادداشت های وبلاگ
Atom
بازدیدهای امروز: 26 بازدید
بازدیدهای دیروز: 63 بازدید
مجموع بازدیدها: 536255 بازدید
[ صفحه اصلی ]
[ وضعیت من در یاهو
[ پست الکترونیک ]
[ پارسی بلاگ ]
[ درباره من ]

نویسندگان وبلاگ :

مجتبی رجب پور (@)[0]

ترجمه متون انگلیسی به فارسی [536]
اولین سایت مقالات علمی ایران [618]
راهنمای کتاب های سراسر جهان [195]
سازمان تجارت جهانی [215]
موتور جستجوگر قوی [192]
پایگاه ملی داده های علوم زمین [139]
سازمان فضایی ایران [1170]
تعین زمان در مناطق مختلف حهان [98]
جستجوی رایگان و انتقال نتیجه به ایمیل شما تا 24 ساعت [255]
اخبار دنیای کامپیوتر [237]
اطلاعات مربوط به دولت های جهان [83]
عکس google earth ( دیدن تمام نقاط زمین تا مقیاس یک بیستم ) [513]
عکس های ماهواره ای [391]
سایت ناسا [312]
[آرشیو(20)]
مرتع وآبخیزداری 84 دانشگاه زابل
معرفی گیاهان دارویی
عکس گیاهان
بیابان
لینکهای هیدرولوژی یاهو ( سایت خارجی )
آموزش arcview [1]
انجمن آبخیزداران امریکا (سایت خارجی )
آموزش سیستم اطلاعات جامع زمین و آب(ILWIS)
حوزه های آبخیز ایران
مجموعه قوانین و مقررات در منابع طبیعی
سازمان هوا شناسی
وزارت علوم ، تحقیقات و فن آوری
کمیته ملی سدهای بزرگ ایران
لینکهای آبخیزداری (سایت خارجی ) [1]
دانلود راهنمای سیستم موقعیت جهانی
دانلود راهنمای فارسی HEC-HMS
( دانلود )آشنائی با IDRISI
سازمان جنگلها مراتع و آبخیزداری
ابرارهای محاسبات انلاین ایران هیدرولوژی
مرجع کامل سدهای ایران
باغهای گیاهشناسی
اداره و مدیریت آبخیز داری (سایت خارجی)
گروه مدیریت آبخیز داری(سایت خارجی)
مهندسی مرتع وآبخیزداری دانشگاه یزد
مقالات مختلف زمین شناسی در انجمن زمین شناسان ایران
مراتع ،مجلات خارجی از جامعه مرتع داران
نقشه زمین لرزه ها(انگلیسی)
سنگهای دوران های مختلف زمین شناسی ایران
ویژگی های استان مازندران
وزارت علوم ، تحقیقات و فناوری،پژوهشگاه اطلاعات و مدارک علمی ایرا
موسسه تحقیقات جنگلها و مراتع کشور
ستاد حوادث و سوانح غیر مترقبه کشور
دانلود فایل نقشه زمین شناسی حوزه نهبندان برای پروژه مرتع 82
مقاله رفتارنگاری سد کرخه با استفاده از روش ابزار دقیق
شیراز بهشت ایران-گالری عکس شیراز
ورودی های 84 منابع طبیعی دانشگاه تهران
انجمن علمی مرتع و آبخیزداری دانشگاه زابل
موسسه گیاهان دارویی زاگرس
سنجش از دور
شبکه علمی کشاورزی و منابع طبیعی ایران(بزرگترین شبکه علمی الکترون
منابع طبیعی تیران وکرون


مقاله مرتعداری
گیاه شناسی
گیاهان مرتعی
مقاله گیاهان مرتعی(انگلیسی pdf)
گیاهان دارویی
علف هرز
صحرا
کویر
گیاهان مناطق کویری
حیوانات مناطق کویری
بادهای مناطق کویری
منطقه خشک
بیابان
آبخیزداری
حوزه آبخیز
مقاله آبخیزداری
مقالات خارجی آبخیزداری
پروژه آبخیزداری
طراحی سد
سد خاکی
سد سنگ چین
سد سنگ و ساروج
سد کنترلی
سد خشکه چین
سد مصالح بنایی
سد سنگچین ملات دار
سد سنگریزه ای
سدهای زیر زمینی
فیلم های مربوط به سد سازی :(WMV)
کتاب توسعه پروژه های آبخیزداری هند
کتابی در مورد عملکرد و تدابیر مدیریتی حاشیه رودخانه
بند سنگی
بند سنگریزه ای
بند چوبی
بند چپری
بند گابیونی
طبقه بندی گالی ها
خندق
چکدم ها
بانکت
سیل
عکس انواع فرسایش
فرسایش بادی
فرسایش بادی (مقاله انگلیسی)
فرسایش خندقی
فرسایش ورقه ای ( سطحی)
فرسایش تونلی
فرسایش کناری
فرسایش شیاری
خاک شناسی
حفاظت خاک(englishمقاله)
حفاظت خاک
حفاظت خاک(فارسی)
بافت خاک
خشکسالی
سنجش از دور
رابطه دام ومرتع
احداث بادشکن زنده
. جنگلهای استوایی
آب زیرزمینی
سوالات کارشناسی ارشد
سوالات کارشناسی ارشد خاکهای خشک و نیمه خشک
سیستم اطلاعات جغرافیایی ( gis )
معرفی کتاب های تخصصی
روش بررسی پوشش گیاهی و خاک از طریق TASSELED CAP TRANSFORMATION (
آموزش ویندوز XP
ilwis وپردازش تصو یر
آموزش power point
آموزش word
آموزش Excel2000
نرم افزار سورفور
مقالات انگلیسی
جستجو در اینترنت
مقالات علمی تخصصی در پایه های کارشناسی، کارشناسی ارشد و دکتری
عکس های ماهواره ای
GPS
دشت کویر
جامعه شناسی
مقالات حفاظت خاک برای دانلود
شیب
چگونگی تدوین مقالات
arc gis
رابطه آبخیز و بیابان
ظرفیت مزرعه(English-pdf)
گسل
کلوت
چیزهای بی ربط
خاکهای آلی
معرفی رشته مرتع و آبخیزداری
پایا نامه محمدرضا اختصاصی
هیدرولوژی
چین ها
انواع سرریز ها(انگلیسی)
فاصله بین کاشت در گیاهان مختلف
مجموعه مقالات سمینارها و کنفرانسهای داخلی
کتاب داده های فرسایش پذیری خاک در مدل جهانی WEPP
کتاب عملیات و راهبردهای کشت
سولات ارشد فرسایش خاک